Which Wire Is Positive On Speaker Wire – Detailed Guide!
Identifying the positive wire on speaker wires is essential for clear sound. Check for color codes, markings, or use a multimeter to ensure proper connections and optimal audio performance.
Identifying the positive wire on speaker wire is essential for setting up an audio system correctly. Properly connecting the wires ensures optimal sound quality and prevents potential damage to your audio equipment.
This comprehensive guide will help you understand how to identify the positive wire on speaker wire and explain the importance of correct polarity in your audio setup.
Understanding Speaker Wire Polarity:
What Is Speaker Wire Polarity?
Speaker wire polarity refers to the positive and negative terminals on speaker wires. Each speaker and amplifier has positive (+) and negative (-) terminals that must match to function properly. Correct polarity ensures that the speakers move in sync, producing clear and balanced sound. Incorrect polarity can cause out-of-phase issues, resulting in distorted audio or diminished sound quality.
Why Is Polarity Important?
Maintaining correct polarity is crucial for several reasons:
- Balanced Sound Output: Correct polarity ensures that all speakers work together to produce a coherent sound stage.
- Preventing Equipment Damage: Incorrectly connected wires can overwork the amplifier and speakers, potentially causing damage.
- Consistent Audio Quality: Properly connected wires prevent phase issues, ensuring the audio remains clear and high-quality.
Identifying the Positive Wire:

Common Indicators
Speaker wires often have specific indicators to differentiate the positive and negative wires. Here are some common methods manufacturers use to mark the positive wire:
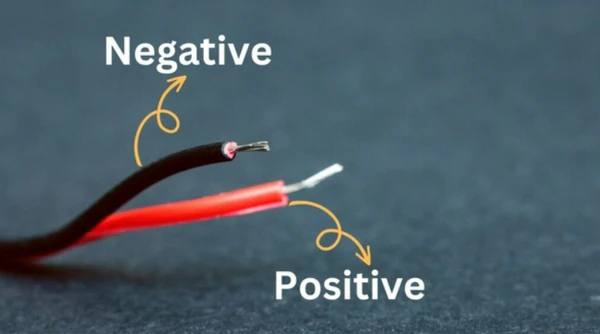
- Color Coding: The most straightforward indicator is color. Typically, the positive wire is red, while the negative wire is black.
- Text and Markings: Some wires have printed text or markings along the insulation to indicate the positive wire. This might include a “+” symbol or other identifiers.
- Ridges and Texture: One wire may have a distinct texture, such as ridges or a stripe along its length, which usually signifies the positive wire.
Using a Multimeter
If your speaker wire lacks visible indicators, you can use a multimeter to identify the positive wire. Here’s how:
- Turn Off Equipment: Ensure all audio equipment is turned off and disconnected from any power source.
- Set Up Multimeter: Set your multimeter to the continuity or resistance setting.
- Test Wires: Place one probe on each end of the wire. The wire with a lower resistance reading is typically the positive wire.
Step-by-Step Guide to Identify Positive Wire:
Step 1: Visual Inspection
Examine the speaker wire closely for any visible indicators:
- Color Coding: Look for red (positive) and black (negative) wires.
- Text and Markings: Check for any printed text, symbols, or markings on the insulation that could indicate polarity.
- Ridges and Texture: Feel along the length of the wire for any ridges or texture differences. A ridged or striped wire often indicates the positive side.
Step 2: Using a Multimeter
If visual inspection doesn’t help, use a multimeter to determine the positive wire:
- Disconnect Wires: Ensure the wires are not connected to any power source or equipment.
- Set Multimeter: Set the multimeter to continuity or resistance mode.
- Connect Probes: Place the multimeter probes on each end of the wire.
- Read Results: The wire with lower resistance is typically the positive wire.
Detailed Steps to Test Speaker Wire:
Step 1: Turn Off All Equipment
Before beginning any testing, ensure that all audio equipment is turned off and disconnected from the power source. This step is crucial for safety and to prevent any potential damage during testing.
Step 2: Prepare the Wire
Inspect the speaker wire for any visible signs of damage, such as cuts, breaks, or corrosion. Use wire strippers to strip about half an inch of insulation off both ends of the wire, exposing the copper wire underneath. This ensures a good connection for testing.
Step 3: Set Up the Multimeter
Turn on the multimeter and set it to measure resistance (ohms). Most multimeters have a selector knob; turn it to the resistance setting, which is usually indicated by the symbol Ω.
Step 4: Measure the Resistance
Touch the multimeter probes to the exposed ends of the wire. The red probe should touch one end, and the black probe should touch the other end. Ensure that the probes are in firm contact with the wire to get an accurate reading.
Step 5: Read the Multimeter
The multimeter will display a value in ohms. A good speaker wire should show very low resistance, typically less than 1 ohm. If the resistance is significantly higher, the wire may be damaged or of poor quality. For example, if your multimeter shows a reading of 2 ohms or more, it’s time to replace the wire.
Also Read: How To Print Google Slides With Speaker Notes – Complete Guide!
Tips for Correctly Connecting Speaker Wires:
Labeling Wires
To avoid confusion, label your speaker wires once you’ve identified the positive and negative sides. This is especially helpful for longer runs of wire or complex setups. Use colored tape or permanent markers to mark the positive and negative wires.
Double-Check Connections
Always double-check your connections to ensure the positive wire connects to the positive terminal on both the amplifier and the speaker, and the same for the negative wire. This step is crucial to maintaining correct polarity and preventing phase issues.
Troubleshooting Common Issues:
Incorrect Polarity
If the sound quality is poor or lacks bass, check for incorrect polarity. Reverse the connections on one of the speakers and test again. Incorrect polarity can cause phase cancellation, reducing the overall sound quality.
No Sound
Ensure that all connections are secure and that the wires are not damaged. Use a multimeter to test continuity and identify any breaks in the wire. If there’s no sound, there may be a break or loose connection somewhere along the wire.
High Resistance
If you receive a high resistance reading, this indicates a problem with the wire. Check for corrosion or breaks in the wire, and if necessary, replace it. High resistance can degrade sound quality and potentially damage your equipment.
Additional Tips for Effective Speaker Setup:

Organizing Your Setup
Organize your speaker wires and equipment for easy identification and troubleshooting. Use cable ties or labels to keep wires neat and easy to manage. This makes it easier to identify and fix any issues that arise.
Regular Maintenance
Regularly inspect your speaker wires for signs of wear or damage. Replace any wires that show signs of corrosion, fraying, or other damage to maintain sound quality. Regular maintenance helps prevent unexpected issues during use.
Using Quality Speaker Wire
Investing in high-quality speaker wire can prevent many issues related to sound quality and connectivity problems. Look for wires with good insulation and robust connectors. Thicker gauge wire is often better for long runs, as it minimizes resistance and potential signal loss.
Testing Continuity
In addition to measuring resistance, you can test for continuity to ensure there are no breaks in the wire. Set the multimeter to the continuity setting, often represented by a sound wave symbol. Touch the probes to the ends of the wire; a continuous beep indicates good continuity, while no beep means there is a break in the wire.
Identifying Wire Polarity:
Correct Connection
It’s important to connect speaker wires correctly to maintain the right polarity. Typically, speaker wire has one side marked (often with a colored stripe or ridges) to indicate the positive terminal. Ensure that the positive wire connects to the positive terminal on both the amplifier and the speaker, and the same for the negative. Incorrect polarity can lead to poor sound quality and even phase issues.
Testing for Polarity
If you are unsure about the polarity, you can use a battery test. Connect the speaker wire to a small battery (1.5V) momentarily. The speaker cone will move outwards if the polarity is correct. This simple test helps you verify the correct polarity without specialized equipment.
Frequently Asked Questions (FAQs):
1. How do I identify the positive wire on speaker wire?
Look for color coding (red for positive), text, or ridges on the insulation. Alternatively, use a multimeter to test for resistance.
2. What happens if I connect speaker wires incorrectly?
Incorrect connections can lead to poor sound quality, phase issues, or potential damage to your audio equipment.
3. Can I use a multimeter to find the positive wire?
Yes, set the multimeter to the continuity or resistance mode and test the wires. The wire with lower resistance is typically the positive wire.
4. Why is it important to maintain correct speaker wire polarity?
Correct polarity ensures balanced sound output and prevents potential damage to your amplifier and speakers.
5. What should I do if my speaker wires are not marked?
Use the multimeter method or label the wires yourself after identifying them through testing or inspection.
Conclusion:
Identifying the positive wire on speaker wire is essential for setting up your audio system correctly. By using visual indicators, texture, or a multimeter, you can easily determine which wire is positive. Correctly connecting your speaker wires ensures balanced sound output and protects your equipment from potential damage. Always double-check your connections and label your wires for future reference. With these steps, you’ll enjoy clear, high-quality audio from your sound system.


